Introduction
Delivery Dates Wizard Pro is a module for Prestashop which allows your customers to choose a delivery date and time for their orders. The module displays a calendar during checkout and available time slots. This is a great module if you need to allow your customers to provide you with a date and time on which their order should be delivered or picked up from a store. An essential module for merchants selling flowers, gifts, D.I.Y products or any other product which benefits from having a deliverable date and time.
The module also allows merchants to set up varying time slots for different days of the week and impose a limit on the number of orders which can be placed within a time slot.
The module also provides you (the merchant) with some important powerful features, all which will be discussed throughout this document.
Installation
The installation procedure is very much similar to most other Prestashop modules. No core changes are required therefore installation is straight forward. Be sure to follow the instructions below for a successful installation:
- Upload the module folder to your store’s module folder: {root}/modules/
- After uploading the module, in the Prestashop Back Office, head over the to the Modules section.
- Search for the module and choose the install option
- After a successful installation the module is ready to be used. Initially the module’s main configuration page will be displayed.
We’ll take a look on how to use the module below.
Configuring the module

The module configuration allows you to set up your calendars, blocked dates and time slots as well as manage some additional features. Each
carrier may have it’s own configuration.
Setting up a calendar
The module allows you to setup a different calendar and set of time slots for each carrier in your store, further more each calendar may have it’s own unique set of blocked dates, weekdays and cut off times. Each weekday can have it’s own set of time slots and some additional configuration.
Choose a carrier for which you wish to enable the calendar for, click the edit link which appears next to the carrier name in the Carriers Table.
A new screen is displayed, divided in to sections; General, Weekdays, Specific Dates, Holidays, Product Rules, as shown on the next page.
General Settings
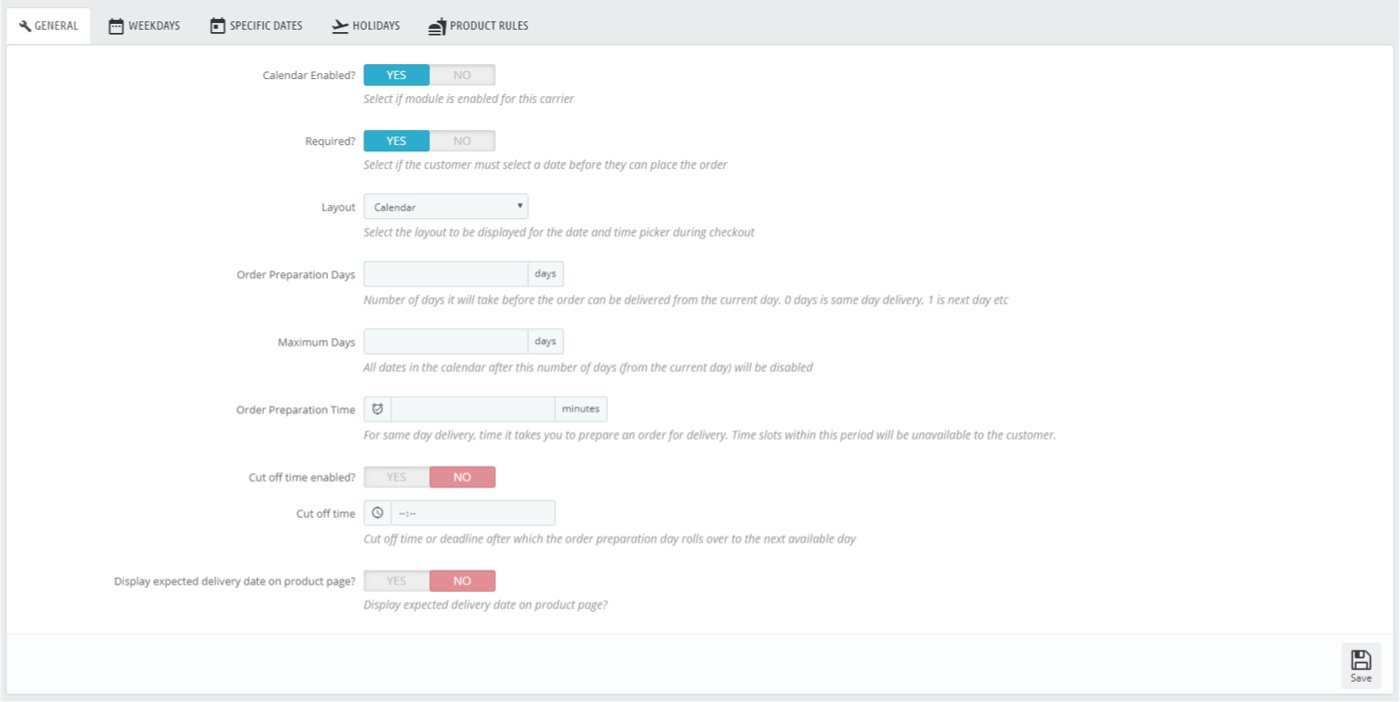
Enabled
Enable or disable the module for the chosen carrier
Required
If enabled, will display a prompt if the customer does not select a delivery date and ?me during checkout.
Layout
Choose the layout for the date picker displayed during checkout to the customer. You can choose from the following layouts.
Calendar
The calendar layout will allow the customer to pick from a traditional calendar and if time slots have been set up these will be displayed along side the calendar
Schedule time table
The schedule table will display the available dates and times in a time table format, this format should only be used if all your delivery days
contain time slots.
Day to day view
This will displaying a responsive panel with all the available days in a compact view. Selecting a day will display the time slots associated with
the day selected (if time slots are available)
Order Preparation Days
Select the number of days from today to disable for selection in the calendar. Can be used with the cut off time (see below)
Max Days
Select the number of days from today which should be selectable in the calendar. All dates after this number will be disabled.
Order Preparation Time
Some orders may require some time to prepare. For example, time to bake a cake or package an order. This field allows you to enter a time period in minutes from the current time, only time slots after this time window will be selactable by the customer during checkout. This ensures you always have ample time to prepare the order and deliver within the time slot selected by the customer.
Cut off time enabled
If you’ve set up order preparation days (above) and you would like to introduce a cut off time during the day after which the order preparation day rolls over another day, then define a cut off time here.
Display Estimated Delivery Date on product page
If you have set up product rules (discussed later) this option allows the estimated delivery time to be displayed on the product page. The ETA is determined using the product exception rules which we shall look into more later.
We have now completed the configuration under the general tab, lets take a look at the week days tab next.
Weekdays Tab
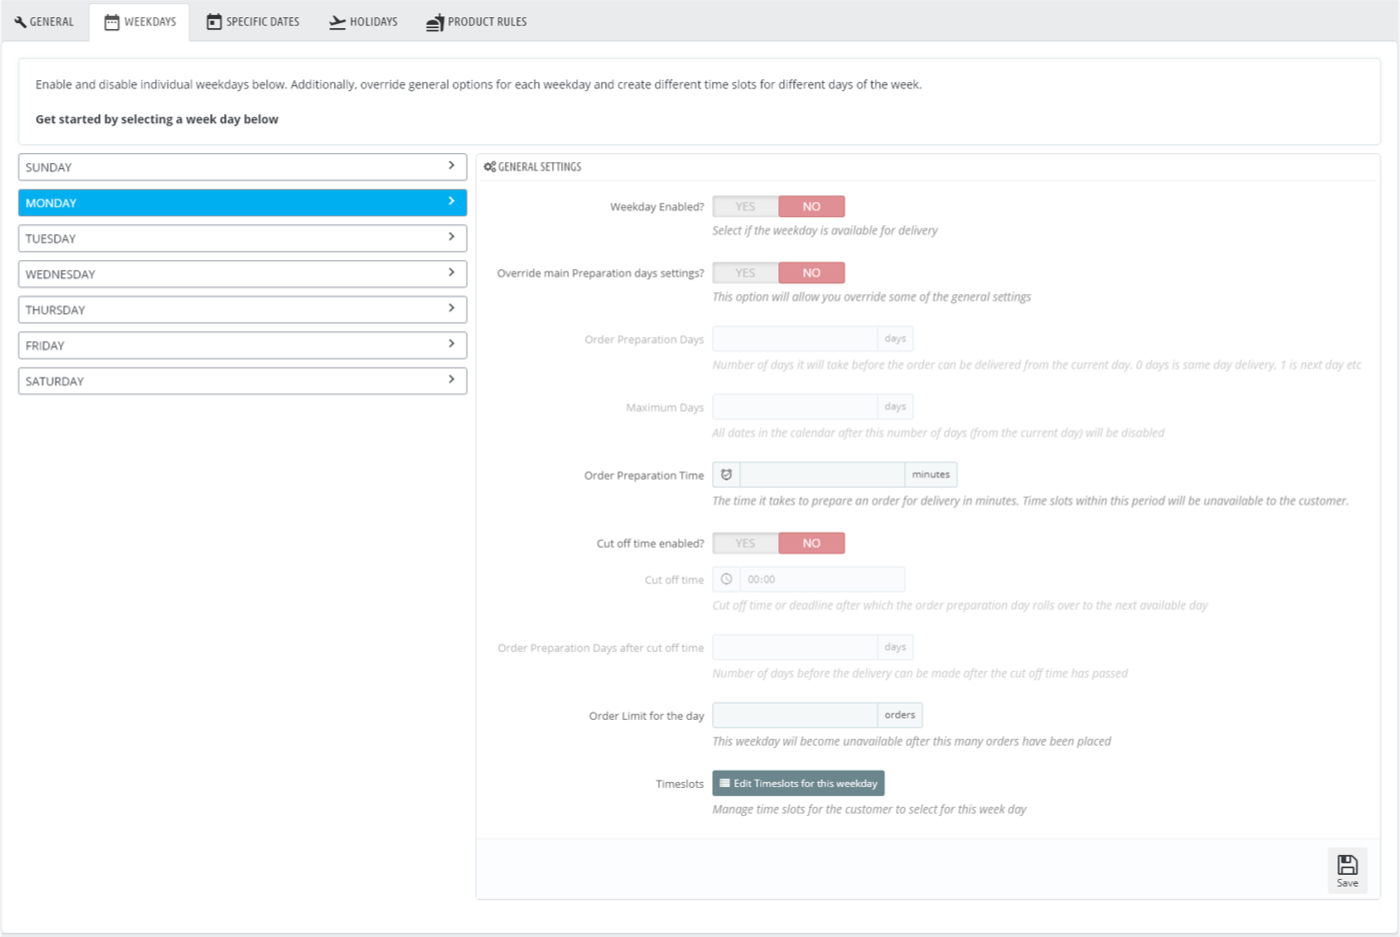
Each weekday can be individually customised. You can edit the weekdays under the weekdays tab, under which, each weekday is displayed. Select a week day to begin configuring it.
Many of the week day settings are the same as the settings found under the general tab, however you can override them for specific weekdays here – therefore the weekday settings will be used instead of the general options.
Let’s take a look at the options not available under the general tab:
Weekday Enabled?
If enabled, the customer will be able to select that weekday in the calendar during checkout.
Override main Preparation days settings?
Allows you to override the order preparation days settings in the general settings.
Order limit for the day
Limits the number of orders that can be scheduled for delivery on this weekday.
Once the order limit has been exceeded the weekday will become disabled during checkout.
Time slots
Each day of the week may have a different set of time slots. A time slot is a delivery time window during the day during which the package will be delivered to the customer. You can create multiple time slots to allow the customer to choose which time slot they would like their parcel to be delivered in.
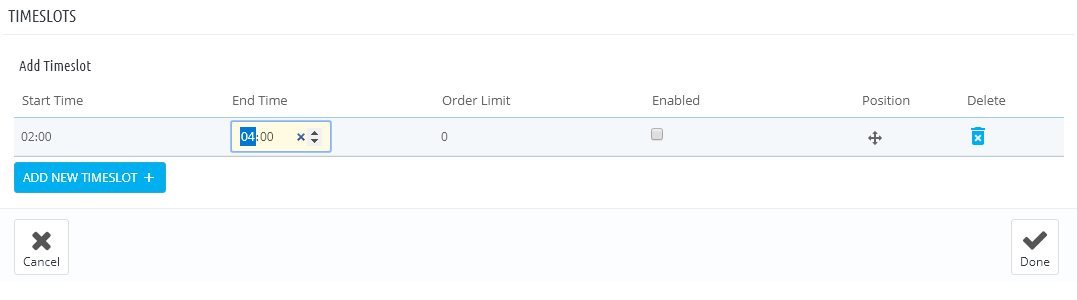
Click on the time slots button to create and manage existing time slots. To add new time slots click the add new time slot button. A new time slot row will be added to the time slots list as shown below:
Click on each field to edit the value. Add additional time slots if required. The fields are explained below:
Start time
The beginning of the time slot period.
End time
The end of the time slot period.
Order Limits
You can limit the number of orders you store can accept within certain time slots by entering any value higher than 0 in the Order Limit Field. Should the number of orders placed for this time slot exceed the value you define here, the time slot will be disabled automatically and the customer will not be able to select this time slot.
Enabled
Indicate whether or not the time is available for selection.
Position
Drag the move icon up and down to re-order the time slots.
After you have finished adding or editing existing time slots press the done button which will take you back to configuring the weekday.
Click save here to save the weekday configuration and the time slots.
Specific Dates Tab
The specific dates tab allows you to apply the same configuration available for each individual weekday to specific dates throughout the year instead. The configuration options are the same as they are for the week day configuration.
Holidays Tab
The holidays section allows you to block single dates or date ranges in the calendar, throughout the year. You can also set up a blocked date to be recurring which would repeat this blocked date or blocked date range for each year without the need for you to set it up each year.
This feature is particularly useful for holiday periods such as Easter, Christmas and various Bank Holidays.
Product Rules Tab
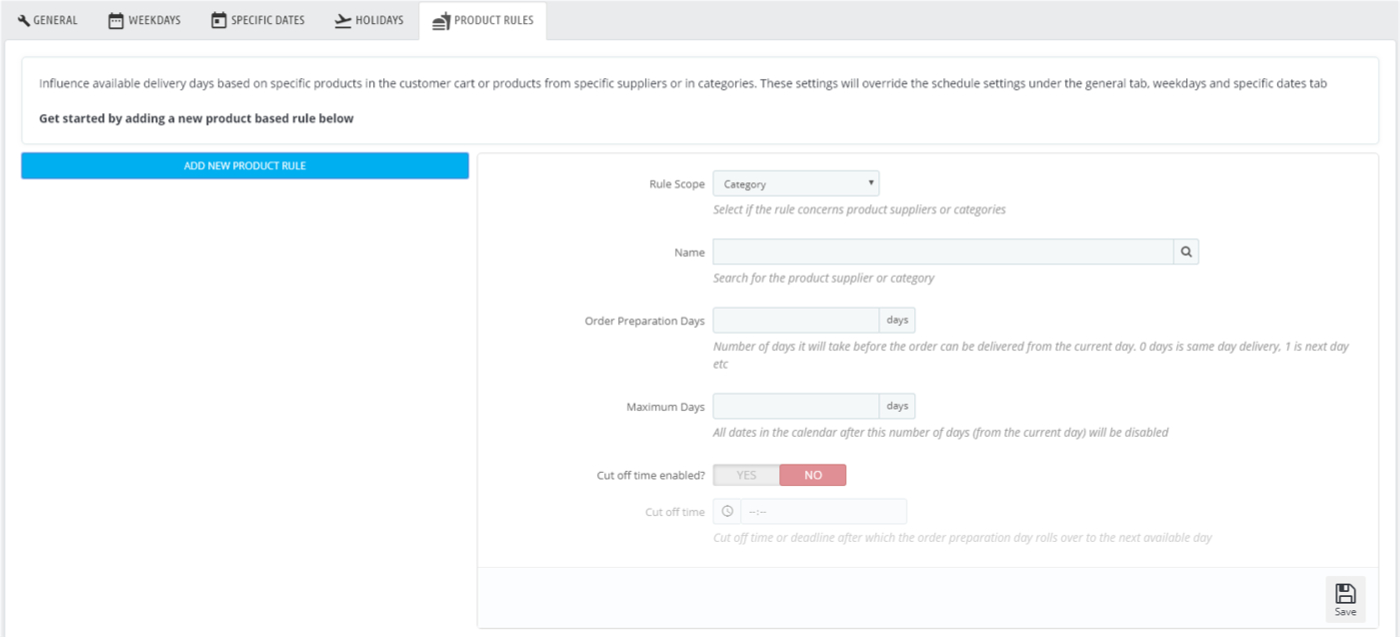
The Product Rules allows you to override the order preparation days (days to available delivery, counting from the current day) and cut off time based on the products which exist in the customer cart. These are determined by product category or supplier.
If you have set up multiple different product rules, and a customer has a mix of these present in their cart, the module will take the latest available day of delivery as the winning rule.
The Product Rules settings are also used to determine the “ETA Time” displayed on the product page as discussed earlier.
Adding a new product Rule
The add new product rule button will display a form to allow you to create a new rule. The options listed below will be displayed.
Scope
Select either Supplier or Category. The override will apply to all products which match the supplier or category of our interest.
Search
Search the name of the supplier or category you wish to create the product rule override for and select it from the list of results which appears as you type in the name,
Order preparation days
Override the min / max days here for this product rule.
Max Days
Override the min / max days here for this product rule.
Cut Off Time
Override the cut off time for this product rule by switching it on and entering a cut off time.
After you have finished defining a product rule, click save to save the rule and return to the Product Rules Tab, where your existing product rules will be displayed.
Delivery Manager
The delivery manager provides you with an overview of all deliveries organised into a schedule / calendar view. This feature makes it easy to see if and when you have deliveries along with the volume of deliveries – at a glance.
The delivery manager feature can be accessed from Modules > Delivery Dates Wizard Pro > Configure > Delivery Manager below is a screen capture showing the button to access the delivery manager.

Click on the delivery manager button shown above and the delivery manager will present you with the Day View overview. Select any date from the list of dates to see all deliveries due on that day. Deliveries are organised into a time line for all deliveries which also have a selected time slot. Deliveries which do not have an associated time slot are organised under the All day deliveries list.
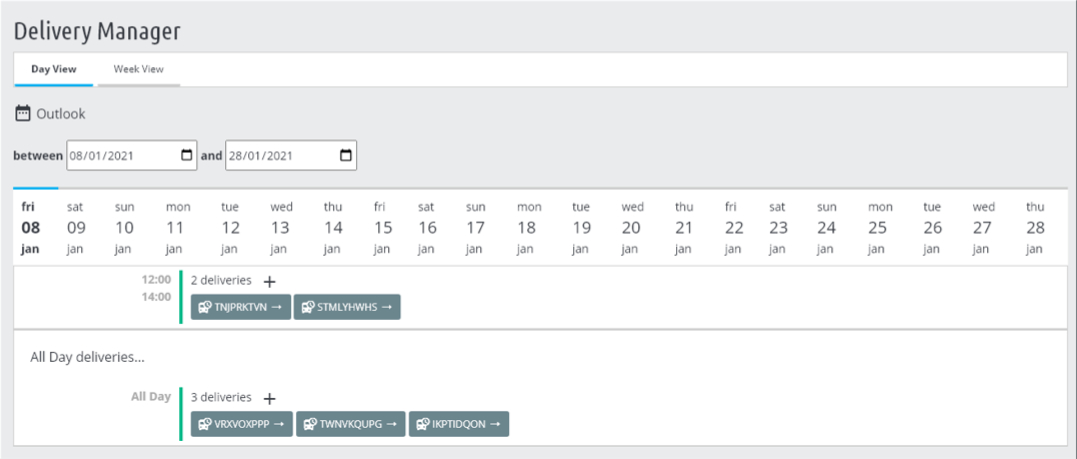
You can list deliveries between two dates by selecting the desired dates from the two date fields. Orders which are due for delivery are displayed in the time line, you can click a specific order to view more details of a particular order / delivery which will open up a drawer panel showing the additional information as illustrated below.
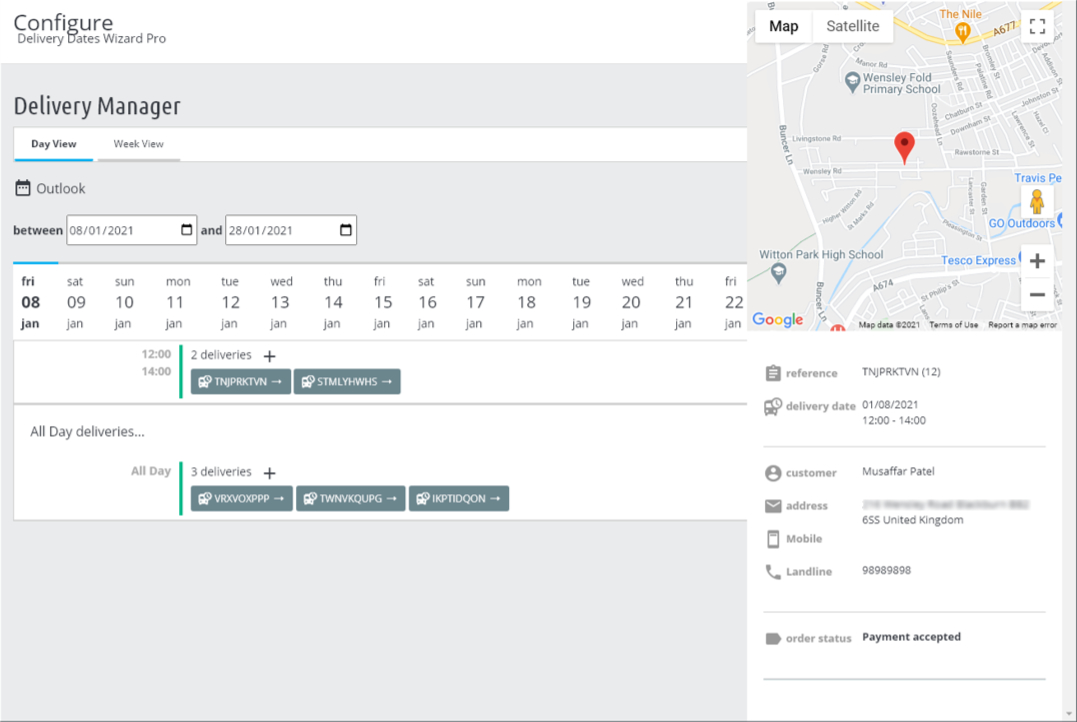
The above screen capture demonstrates the additional order and delivery information for a particular order.
The delivery manager also provides a week view which organises deliveries into weekdays providing you with an overview of the week and the deliveries / volume of deliveries. The week view is shown below:
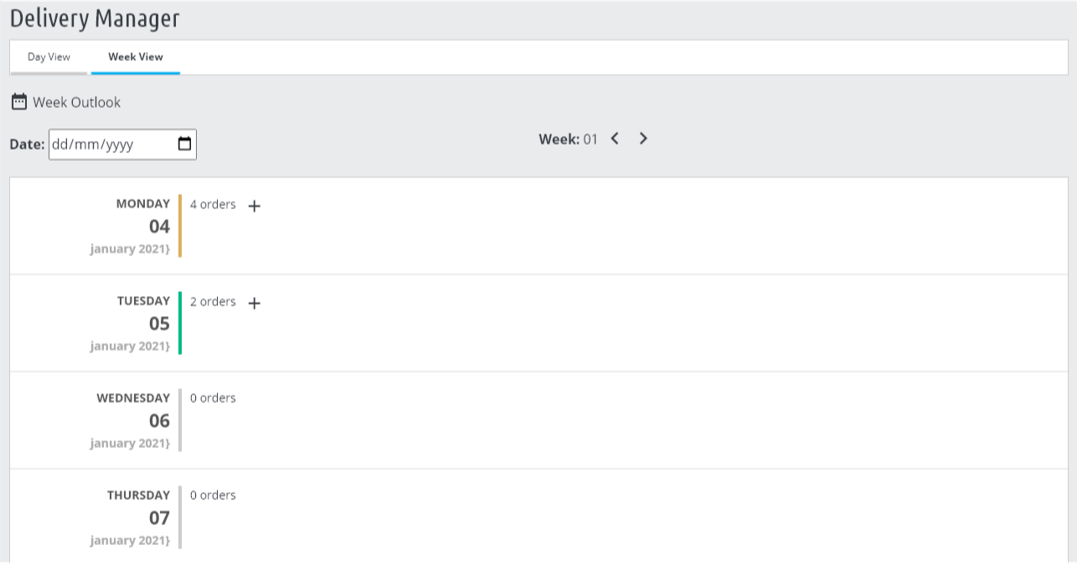
You can further expand each week day to see exactly which deliveries are pending for that day as shown below.

Furthermore, you can select each individual order to see further information about that delivery and order as in the Day view.
To change the week you are viewing, select a date from the date field above the week view. This will display the entire week for the selected
date. You can also navigate week using the left and right arrow icons.
Delivery Dates in the back office
The delivery date and time associated with an order is displayed in the following locations:
- The Order Details Page
- The Order List Page – You can also filter orders by the order delivery date
- The Order Invoice
- The Delivery Slip
- The Order Confirmation Email (Requires additional setup, discussed later)
- The New Order Email Notification (Requires additional setup, discussed later)
Displaying the Order Delivery Date and time in the Order Confirmation Email
Before the order delivery date and time can be displayed in the order confirmation email, we need to add two short codes to your order confirmation emails. Your order confirmation can be located in:
/mails/en/order_conf.html
Where “en” should be substituted with the language(s) of your store. After locating the files add the following two variables to your file, feel free to add additional styling if required:
{ddw_order_date}
{ddw_order_time}
Displaying the Order Delivery Date and time in shipped (dispatched) email
To display the delivery date and time in the shipped email, we need to add two short codes to your shipped email templates. The template is located in:
/mails/en/shipped.html
Where “en” should be substituted with the language(s) of your store. After locating the files add the following two variables to your file, feel free to add additional styling if required:
{ddw_order_date}
{ddw_order_time}
Delivery date and time in the new order notification email
The Delivery Dates Wizard module can also be integrated with the Prestashop Mail Alerts module, the process however is manual and requires modifying the mail alerts module. Follow the steps below to integrate with the Mail Alerts Module.
In the /modules/ps_emailalerts/ps_emailalerts.php file, add the following lines of code to the $template_vars array in the validateOrder function. The array is declared around line 350 but this may vary from version to version and from site to site: Please note in Prestashop 1.6 the file is /modules/mailalerts/mailalerts.php
'{ddw_order_date}' => $order->ddw_order_date,
'{ddw_order_time}' => $order->ddw_order_time,
Add the following code just before the line of code which starts: if ($dir_mail) Mail::Send(. Again this is in the same file and function and occurs around line 434.
if (Module::isEnabled('DeliveryDatesWizardPro')) {
	$cart_ddw = Hook::exec('ddwValidateOrder', array('id_cart'=>$params['cart']->id), null, true);
	$cart_ddw = $cart_ddw['deliverydateswizardpro'];
$template_vars['{ddw_order_date}'] = ($cart_ddw['ddw_order_date'] != '' ? Tools::displayDate($cart_ddw['ddw_order_date']) : '');
$template_vars['{ddw_order_time}'] = ($cart_ddw['ddw_order_time'] != '' ? $cart_ddw['ddw_order_time'] : '');
}
Add the following template tags :
{ddw_order_date}
{ddw_order_time}
to /ps_emailalerts/mails/en/order_new.html or/mailalerts/mails/en/order_new.html in Prestashop 1.6.
Front End
After configuring the module, the date and time slot picker will be displayed during the checkout process in your store front. The module is displayed just after the carrier selection list. Below are a few examples of the module display.
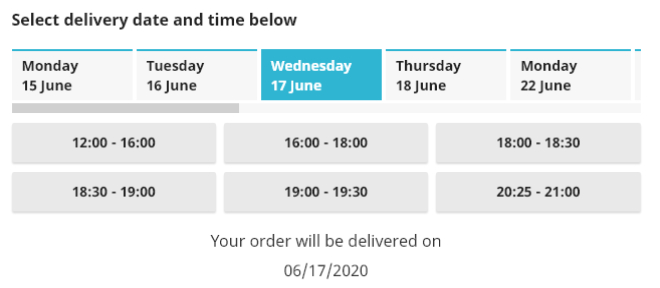
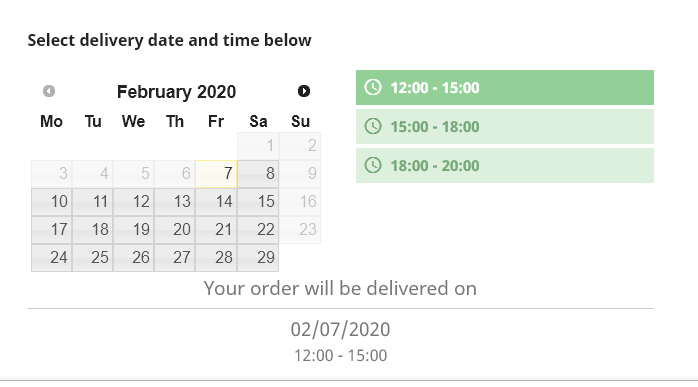
Calendar Layout
If you have configured the module to display the calendar layout, the layout shown below will be displayed during checkout. The calendar and time slots are displayed separately and the customer can select a date and then a time slot for the selected day.
If you have not set up any time slots then only the calendar will be displayed.
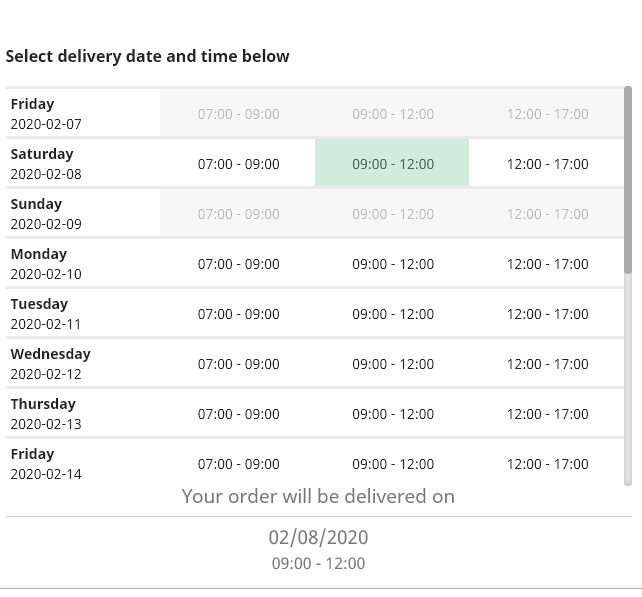
Schedule Table Layout
Please note this layout should only be used if all your deliverable days contain time slots.
Day to Day View Layout
Please note this layout should only be used if all your deliverable days contain time slots.