Introduction
The Product Price Area Table lets customers enter dimensions like width and height, then automatically retrieves the price from a linked table. If an exact match isn’t found, it returns the nearest price, enabling staggered or stepped pricing based on size.
You can assign multiple price tables to a product via options—for example, ‘Gold Blinds’ and ‘PVC Blinds’ can each use their own table—enabling matrix-based pricing.
Finally, your existing attribute impacts will remain effective therefore allowing you to create highly customisation products and sell them online.
Store owners often use the module for products like window blinds or doors. For example, Roller Blind pricing can be based on dimensions via a price table, with optional add-ons like decor at a fixed cost. The Product Price Area Table enables this flexible pricing setup.
Installation
The installation procedure is very much similar to most other Prestashop modules. No core changes are required therefore installation is straight forward. Be sure to follow the instructions below for a successful installation:
- Upload the module folder to your store’s module folder: {root}/modules/
- After uploading the module, in the Prestashop Back Office, head over the to the Modules section
- Search for the module and choose the install option
- After a successful installation the module is ready to be used. Initially the module’s main configuration page will be displayed. We’ll take a look at how to use the module below
Configuration
There are 2 scopes for configuring the module, Global and Product. Let’s start by taking a look at the Global configuration options.
Global Configuration

After opening the module configuration you should see the tabs Dimensions, Global Price Tables and Global Options.
Dimensions
Dimensions correspond to the various dimensions that will be available in your module. By default, width and height are installed. Each
dimension must map to either the row or the column in your price tables, which will allow the module to determine the price from a price table.
You can either either edit a dimensions under this tab or add a new dimension if required. When you edit or choose to add a new dimension
(from the new dimension button in the top right) you will be presented with the following form:
[Name]
Internal name to help you identify the field, such as “height”
[Display Name]
Enter the label which will appear for this dimension when displayed as a field on the product page. Enter text for each language in your store
using the language selector in the input.
[Csv Table Mapping]
Choose to either map this dimension to the rows or columns in your price table for the price look up.
[Hint Image]
Optionally upload an image which will be displayed as a hint when displaying product fields using this dimension. You may upload an image for each active language in your store.
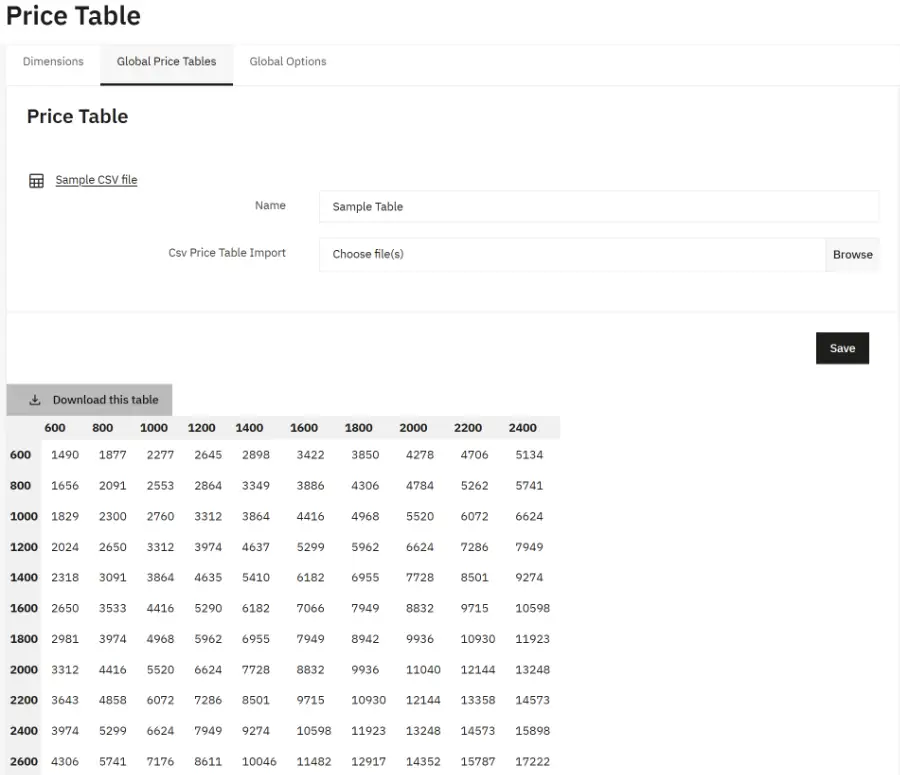
Global Price Tables
The heart of the module is to allow you to import price tables and associate them with products. Under this tab you can import global price
tables. Global price tables are price tables which will be available for assignment to all products in your store.
Click the New Global Price Table button from the to right to create a new table. You can now select a CSV price table to import and also provide a
name for it.
Click the sample CSV file link to download a sample CSV price table to help you get started with your first price table.
After importing the price table, you should be able to view it as shown below:
Global Options
In addition to associating a price table with a product, it’s possible a single product may need more than one price table based on a particular option, such as Material.
For such scenarios, you can setup some global options under this tab. Click the New Option button in the top right hand corner. You will see the
following form:
[Name]
Internal name of the option.
[Display Name]
Localised label text to be displayed for this option when displayed on the product pages.
After saving, you can now start adding the values that the user can select for this option, such as UPCV, Wood, Steel etc.
Now that we have finished setting up the global module configuration, we can start assigning price tables to individual products in our store.
Product Configuration
To start assigning price tables to individual products, navigate to Catalog > Products and choose a product. Under the modules tab, choose to configure this module and click configure the product button. You will now see the following tabs: General, Fields, Price Tables, Table Options.
General
Under the general tab you will see the following form options
[Enabled]
Choose whether or not the module is enabled for this product or not.
[Price Table]
Choose an existing price table to associate with this product.
[Price Table Unit]
Let the module know what unit of measurements the dimensions in the price table correspond to for this product.
[Allow the customer to switch between these units]
You can optionally allow the customer to enter dimensions in different units to the unit used in your price table. The module will automatically convert to the correct unit when calculating the price.
Fields
Under this tab we need to select which fields will appear on the product page. Only 2 fields can be assigned, and one must be mapped to the rows in your price table while the other to the columns.
Let’s add a new field by clicking the Assign Field button in the top right. You will then see the following form:
[Dimension]
Choose which dimension the fields maps to (this will also determine if the field is mapped to rows or columns in your price tables)
[Unit]
The unit of measurement the value in this field is entered in by the customer.
[Display Type]
Choose text box to allow the customer to type in a value. The module will look up the price table based on the values entered. If the value entered does not correspond directly to a row or column then the module will determine the closest match upwards.
Choose dropdown and the module will allow the customer to select from a predefined list of values. The values available will be determined from the rows or columns in your price table.
[Min Value]
Enforce a minimum value the customer must enter.
[Max Value]
Enforce a maximum value the customer must enter.
[Default Value]
Default value for the field.
[Decimals]
Limit the number of decimals that the customer can type into the field.
After adding the 2 required fields to your product, you can set up / import some price tables specifically for the product you are configuring.
Price Tables
Under this tab you can import price tables specifically for the product you are configuring. The price tables you import here can be assigned to the product under the General tab or to individual options under the Table Options tab. Any global price tables you may have setup will also be available under these two tabs.
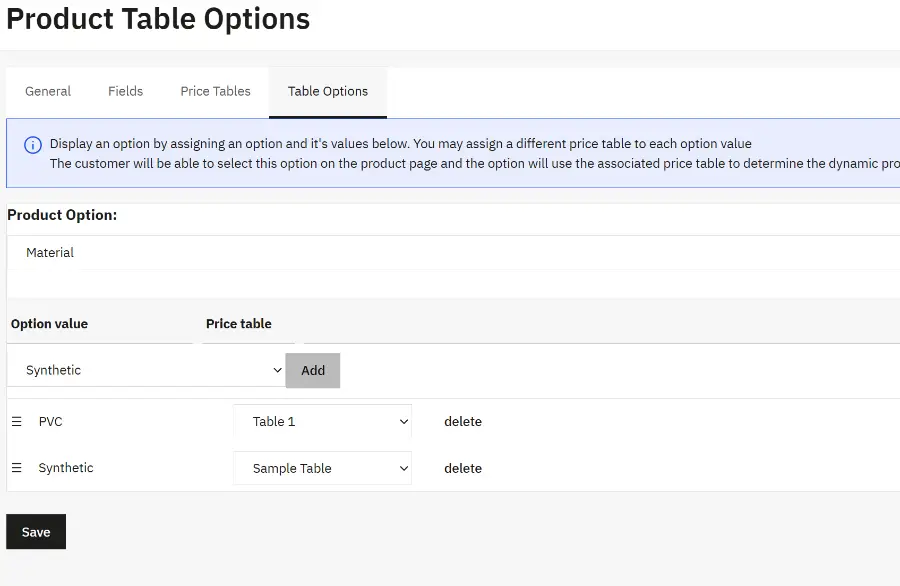
Table Options
Earlier we discussed how in some cases you may need to assign different price tables based on a variation of the product (product option) such as Material. Under this tab we can choose which option to associate with this product (options which we created in the module Global configuration earlier). And assign option values and then associated a unique price table for each of these option values.
Store Front
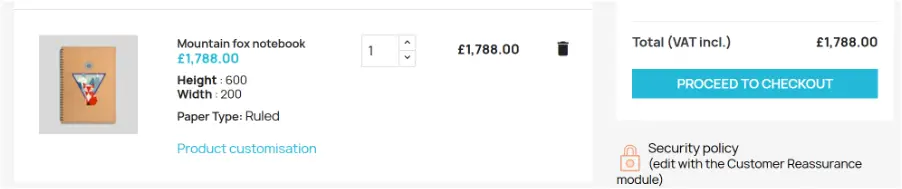
Once the module has been configured correctly, the module should appear on the product page:
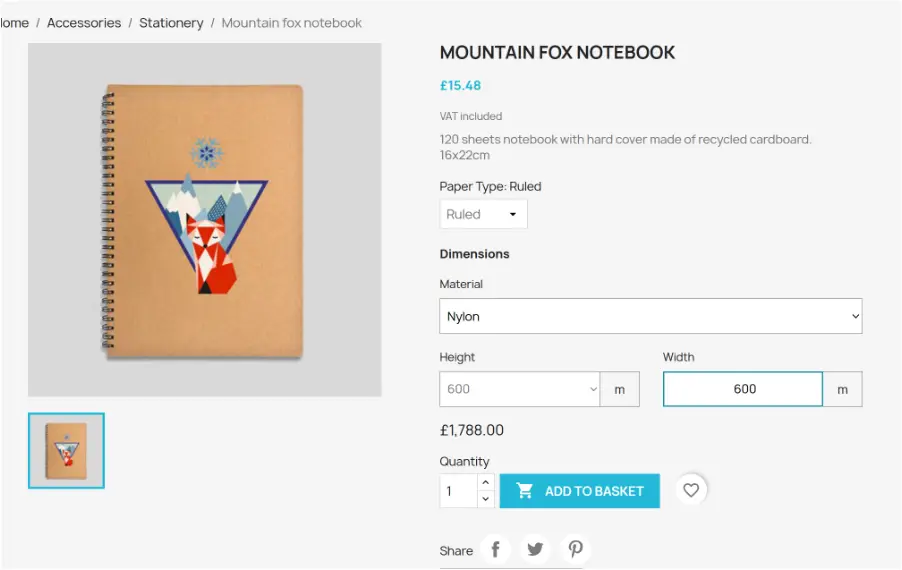
And the selected dimensions should appear throughout checkout, back office order details, invoices etc. The price should be based on the price
defined in the price table for the dimensions entered or selected by the customer: