
Introduction
The Delivery radius pro module allows you to either offer specific carriers during checkout or change shipping costs based on delivery radius and
carrier as well as other conditions such as cart total, products in cart, and day and time.
Installation
The installation procedure is very much similar to most other Prestashop modules. No core changes required therefore installation is straight
forward, be sure to follow the instructions below to ensure a successful installation.
- Upload the module folder to your stores
{root}/modulesfolder - Once uploaded, login to your Prestashop Back Office and head over to the Modules section
- Search for the module and click Install
- After a successful installation, the module configuration screen is presented to you. More details on this in the next section.
Configuration
Lets begin by taking a look at the global module configuration before we look at configuring individual products. Open the global module configuration from the module panel below:

After opening the module configuration you should see the initial configuration screen with 3 tabs; Rules, Carrier setup and Configuration. Let’s take a loot at each tab.
Rules
The rules tab allows you to create delivery radius rules. Each rule allows you to either hide or change the price of a shipping option in your store
based on multiple conditions, which include delivery distance, products, day and time of the week and also cart total.
You can create multiple rules for more sophisticated configurations, but in most cases creating just one rule should be adequate.
We’ll look at creating rules and the various conditions and configurations available for a rule later in this document.
Carrier Setup
Before the module can determine distances between a carrier and the customer we must let the module know the address of each carrier. Open
Carrier Setup tab and edit a carrier to see the form below.
[Post code]
The postcode of the carrier.
[Country]
The country of the carrier.
Configuration
Under the configuration tab enter your Google Distance Matrix Api key. You’ll need to sign up for this The link below should help you get started
in creating and obtaining your key:
https://developers.google.com/maps/documentation/distance-matrix/get-api-key
Rule Setup
Now that we’ve taken care of the basic module configuration we can start creating our first rule. Under the rules tab click the create rule button.
You should see the form below:
[Rule Enabled]
Choose if this rule is active or not.
[Name]
Choose name for the rule to help you identify it.
[Radius from (km)]
This rule will be triggered for distances starting from this distance from the carrier to the customer.
[Radius to (km)]
This rule will be triggered for distances to this distance from the carrier to the customer.
[Action]
This action will take place when the above conditions are satisfied. The following actions are available:
Hide Carrier: The carriers (which we will select under the carriers tab next) will be hidden when this rule is satisfied.
Custom Price: A custom price will be applied to the carriers associated with this rule when the conditions of this rule are satisfied.
Now save the form. After saving the form, the following additional tabs will appear: Carriers, Categories/Suppliers, Specific Products,
Weekdays/Timeslots, Cart Total. These all allow you to specific additional conditions which need to be met for the rule to get triggered.
Lets take a look at each of the tabs.
Carriers
Select the carriers in your store this rule will act on when the rule is satisfied.
Categories / Suppliers
If you select any categories or suppliers under this tab, then the rule will only be triggered if the cart contains products from any of the selected categories or suppliers
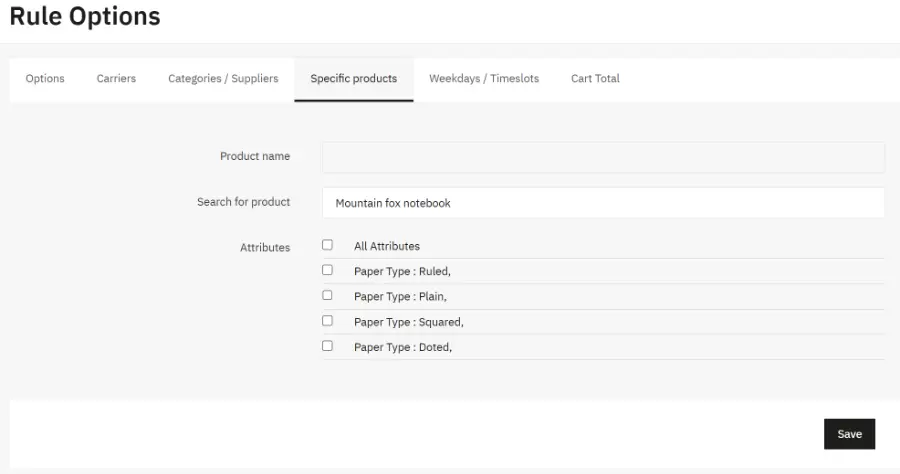
Specific Products
Under this tab you can define a list of specific products which will trigger the rule if they are present in the cart. Click the Add product button to
add a product. This will present a form which allows you to search for a product and add it the list of specific products. Additionally you can
restrict to the products in the cart containing only certain attributes.
Weekdays / Timeslots
Under this tab you should see something similar to the form below:

To limit to the rule to only certain days of the week, Enable the Limit radius rule on this weekday option for the desired weekday(s) and the rule will only be triggered if the current day of the week matches one of the enabled weekdays.
Furthermore for each weekday you can define timeslots. If timeslots are defined then the rule will only be triggered if both the day of the week
and the timeslot match the available timeslots you have setup for the weekday in question.
Cart Total
This tab allows you set a condition for the rule to only be triggered if the cart total is between a certain range.
These various conditions allow you to create flexible rules. For example:
Charge an additional 10.00€ for the carrier “My Carrier” if the customer cart contains any product from Category X and the cart total is under
100€ and the radius is over 20km.
You can also multiple rules to target different sets of conditions. For example, we could create an additional condition which hides “My Carrier” if the delivery radius is over 50km.
Now that you have set up a rule, you can create additional rules if you need to.
Front End
Depending on your setup, when the customer is placing an order during checkout, certain carriers may or may not be available to them, or the
shipping cost may change depending on the various conditions we have created in our rules.
This concludes the user guide for the module.